Getting ready
This recipe expands upon the previous one, adding a second load-balancer system and a VIP. You will need to build the second load balancer and acquire an additional IP address for the VIP. Your IPs should be similar to the following:
| Host | IP |
| web1 | 192.168.56.200 |
| web2 | 192.168.56.201 |
| lb1 | 192.168.56.202 |
| lb2 | 192.168.56.203 |
| vip | 192.168.56.204 |
Table 6.4 – Keepalived IP addresses
How to do it…
Before you start configuring Keepalived, you need to configure HAProxy on the second server. You can easily install HAProxy, open up the firewall ports, and copy over the config file from the existing system.
You can test this by simply pointing your browser to the second load balancer and seeing the app server.
Next, we will start to configure Keepalived.
For each load balancer, you will need to install Keepalived as the root user:
dnf -y install keepalived
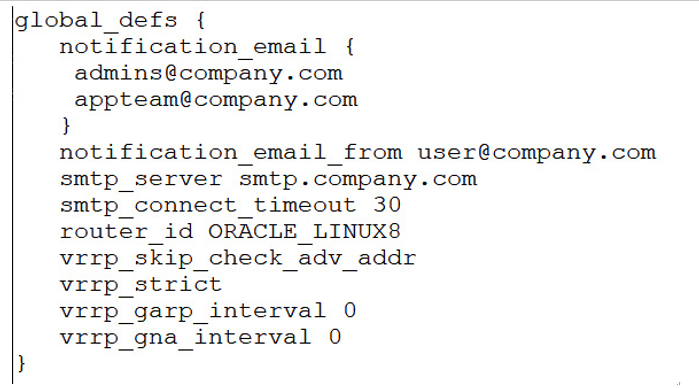
Next, we will need to edit the Keepalived config file. This is found in /etc/keepalived/keepalived.conf. There are two major sections to edit, global_defs and vrpp_instance.
global_defs is the global definition used by Keepalived. These settings are used by all vrrp_instance types configured in the system.
There are several parameters that you will need to update:
- notification_email: This is a list of email addresses that will be emailed when there is an event
- notification_email_from_user: This is the sending email address
- smtp_server: This is the SMTP relay server
- router_id: This is a unique name for this Keepalived cluster
For the sample, this section looks like the following:

Figure 6.12 – Keepalived globals
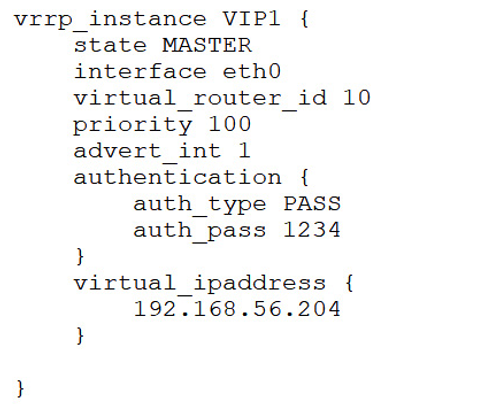
The next section is vrrp_instance. You can have multiple vrrp_instance types in the cluster, each supporting different VIPs.
For vrrp_instance, you need to give each one a unique name. Additionally, there are several parameters that will need to be updated:
- state: The state of the instance, usually master for the primary node and backup for the secondary node.
- interface: The Ethernet interface used for this host in the cluster.
- virtual_router_id: A unique number for this instance. No other instances should use the same ID.
- authentication: This section defines how members are authenticated:
- auth_type: Normally sent to PASS, to allow nodes to authenticate as members of this instance. There is a second support type called Authentication Header (AH), but it is not recommended for use.
- auth_pass: The password for the instance.
- virtual_ipaddress: A list of VIPs managed by this instance.
In our example, the section will look as follows;

Figure 6.13 – Keepalived vrrp_instance
Once the config file is built, copy it over to the second load balancer. Do not forget to change the state to BACKUP on the second system, and also update the interface if it is different on that system.
Next, start Keepalived on both nodes with the following command as the root user:
systemctl enable –now keepalived
You can now point your browser to the VIP! This is seen in the following example.

Figure 6.14 – Keepalived VIP in use
You can check the status by looking at the journal entries for the daemon, using the following command:
journalctl -u keepalived
This will show all the activity of the daemon. You should see Sending gratuitous ARP messages, as this is the system checking the health. You will also see messages about the state, such as Entering MASTER STATE or Entering BACKUP STATE, as the system switches between MASTER and BACKUP.
