How to do it…
Now that all the prep work has been completed on each of the nodes, we will create the trusted storage pools and encrypt the communications. This will have everything ready to create volumes, where data is stored and shared.
A trusted storage pool in Gluster pertains to a setup where a cluster of Gluster servers, referred to as storage nodes or peers, have established trust among themselves to work together within a storage cluster. This trust is established through a trusted storage pool configuration that typically involves the following steps:
- Authentication: Various methods, such as SSH keys, certificates, or shared secrets, can be used to authenticate nodes in the trusted storage pool. This ensures that only authorized servers are part of the storage cluster.
- Authorization: After nodes are authenticated, they authorize each other to access and manipulate specific data within the Gluster storage cluster. The authorization settings determine which nodes have read and write access to particular volumes or bricks within the cluster.
- Communication: Members of the trusted storage pool communicate over a secure network to replicate data, synchronize metadata, and perform other cluster-related operations, ensuring that the storage cluster functions cohesively.
- Data integrity: Trusted storage pools ensure data integrity and redundancy via distributed replication across multiple nodes.
- Scalability: It is possible to add more storage nodes to the trusted pool, which enhances storage capacity and performance. The trusted nature of the pool makes it easy for new nodes to join the cluster and contribute to its resources.
In Gluster, a trusted storage pool is a crucial element as it lays the foundation for the fault-tolerant and distributed nature of the filesystem. It guarantees that all nodes within the cluster can work seamlessly and securely in collaboration with each other. The following steps will walk you through how to create a GlusterFS on two hosts.
- To create the pool, we need to probe the other nodes in the cluster. In this example, we will probe from gluster1 to gluster2 using the gluster peer probe gluster2 command:
[root@gluster1 etc]# gluster peer probe gluster2
peer probe: success
2. You can then use the gluster pool list command to see what nodes are peered with the node where you ran the command from; in the following example, the command was run on gluster2:
[root@gluster2 etc]# gluster pool list
UUID Hostname State
b13801f3-dcbd-487b-b3f3-2e95afa8b632
gluster1 Connected
bc003cd0-f733-4a25-85fb-40a7c387d667 localhost Connected
3. Here, it shows gluster1 and localhost connected as this was run on gluster2. If you run the same command from gluster1, you will see gluster2 as the remote host:
[root@gluster1 ~]# gluster pool list
UUID Hostname State
bc003cd0-f733-4a25-85fb-40a7c387d667 gluster2 Connected
b13801f3-dcbd-487b-b3f3-2e95afa8b632
localhost Connected
4. Now that we have the cluster, let’s create a replicated volume. This volume will re-write the bricks across the cluster, enabling protection against failed storage or a failed node.
The following command will create the volume:
gluster volume create data1 replica 2 gluster{1,2}:/data/glusterfs/volumes/bricks/data1
Once the volume is created, we need to start it:
gluster volume start data1
5. We now can mount it. For now, we will use the Gluster native client, and mount it on the /mnt mount point:
mount -t glusterfs gluster2:data1 /mnt
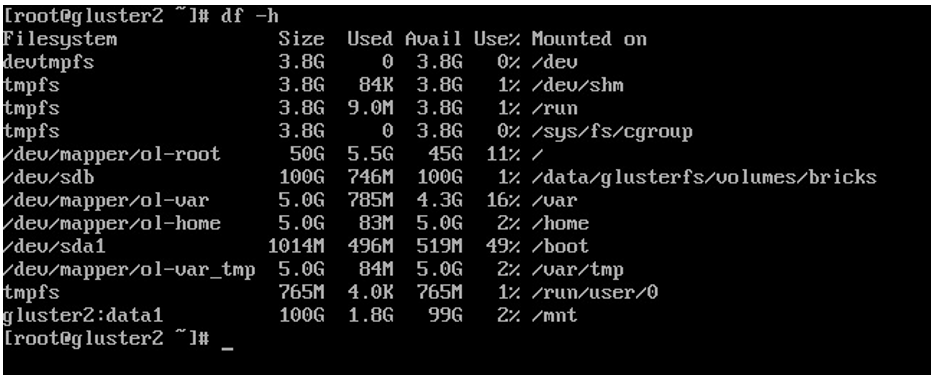
6. We can now see the storage mounted using the df command:

Figure 6.23 – data1 mounted on /mnt
7. If you want to mount this on other nodes, you will need to repeat the command on each node, updating the node name as needed. The following example shows mounting on gluster1:
mount -t glusterfs gluster1:data1 /mnt
- Next, we need to set up the encryption using the keys we previously created. The first step is to take the .pem files previously created and concatenate them into the /etc/ssl/glusterfs.ca file. This file should be placed on all nodes of the cluster.
- Now, we need to enable the encryption. This is done by touching the secure-access file on each node using the following command:
touch /var/lib/glusterd/secure-access
10. Now, for each volume, we will need to enable SSL for both the client and the server. In the example command, we will enable this for the data1 volume that was just created:
gluster volume set data1 client.ssl on
gluster volume set data1 server.ssl on
Now, restart glusterd:
systemctl restart glusterd
Gluster communication is now encrypted for this volume.
